
我的要求是使用RED eclipse编辑器在机器人框架中使用用户定义的java库。当尝试在机器人框架中指定库时,系统错误为没有可用的库(库名称以红色下划线显示)。请纠正我的错误。我遵循以下步骤,
>
为以下jar更新了类路径,
jarc)myOwnJavaLibrary. jar(我在步骤3中创建的jar)d)jdk和jre路径
创建RED Project并开始初始化关键词如下,
a)图书馆Selenium2Library
b)库org. bot.KCCKeywords.LogonToKCC
这是系统无法读取我自己的库的地方。我也参考了下面的博客并相应地调整了我的步骤。但没有帮助我。参考多个博客和堆栈也让我困惑。终于我来了。
使用codecentric博客:机器人框架教程——用Java编写关键字库作为基础,并为RED而不是RIDE提供一些具体步骤。本走查将允许您设置Jython,在Java中创建一个简单的库,并从机器人脚本运行它。
在Eclipse中安装Eclipse(NEON)和RED Feature后,在Eclipse中创建一个新的Java项目。完成后,继续创建一个包含以下内容的新Java类。
package org.robot.sample.keywords;

import java.util.Stack;

/**
 * This is an example for a Keyword Library for the Robot Framework.
 * @author thomas.jaspers
 */
public class SampleKeywordLibrary {

    /** This means the same instance of this class is used throughout
     *  the lifecycle of a Robot Framework test execution.
     */
    public static final String ROBOT_LIBRARY_SCOPE = "GLOBAL";

    //</editor-fold>
    /** The Functionality to be tested */
    private Stack<String> testStack;

    /**
     * Keyword-method to create an empty stack.
     */
    public void createAnEmptyStack() {
        testStack = new Stack<String>();
    }


    /**
     * Keyword-method to add an element to the stack.
     * @param element The element
     */
    public void addAnElement(String element) {
        testStack.push(element);
    }

    /**
     * Keyword-method to remove the last element from the stack.
     */
    public void removeLastElement() {
        testStack.pop();
    }

    /**
     * Keyword-method to search for an element position.
     * @param element The element
     * @param pos The expected position
     */
    public void elementShouldBeAtPosition(String element, int pos)
            throws Exception {
        if (testStack.search(element) != pos) {
            throw new Exception("Wrong position: " + testStack.search(element));
        }
    }

    /**
     * Keyword-method to check the last element in the stack.
     * @param result Expected resulting element
     */
    public void theLastElementShouldBe(String result) throws Exception {
        String element = testStack.pop();
        if (!result.equals(element)) {
            throw new Exception("Wrong element: " + element);
        }
    }
}
请确保您使用Windows安装程序安装了Jython。在我的示例中,Jython安装在c:\Jython中。与常规Python解释器机器人框架仍然需要安装。假设您的机器可以访问Internet,在命令行中转到c:\Jython\bin\并运行命令pip install robotFramework。这将在Jython环境中安装机器人框架。
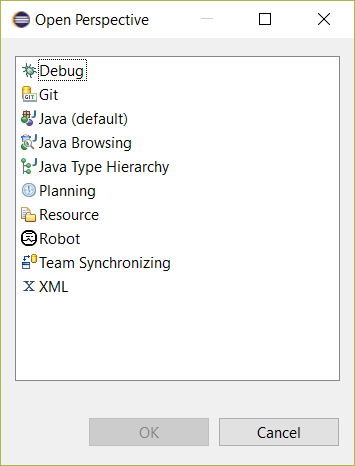
现在在Eclipse中创建一个新的Robot Framework项目。请确保您有Window

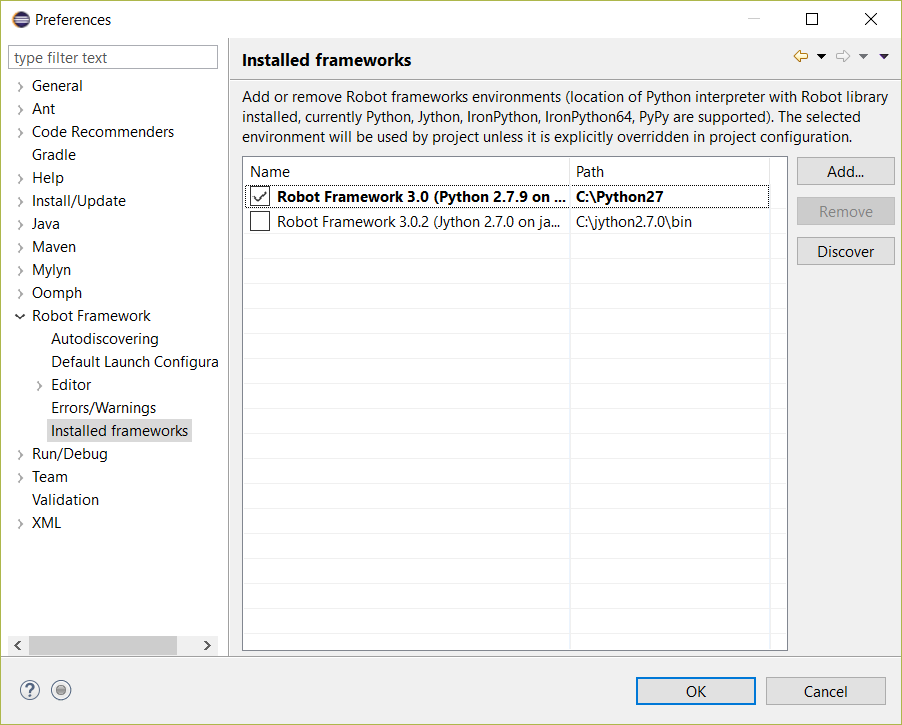
在项目中,默认的机器人框架是基于Python的,我们需要配置Jython解释器。在Eclipse中,转到窗口

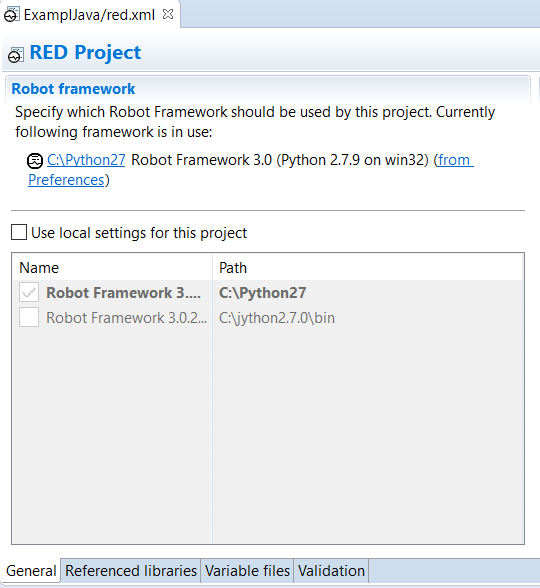
从机器人项目中打开Red. XML并转到常规选项卡。这是项目解释器设置的位置。如果它设置为Python(如下面的示例),然后单击使用此项目的本地设置并检查Jython解释器。将设置保存到文件(CTRL-S)。

使用Robot Framework项目设置,是时候将Java类导出到Jar文件。右键单击类文件并单击导出。然后选择JAR文件并单击next。单击Browse并设置JAR文件的位置和文件名。在这种情况下,我选择了ExcpleLibrary. jar和我的机器人项目的文件夹。按Finish完成导出。
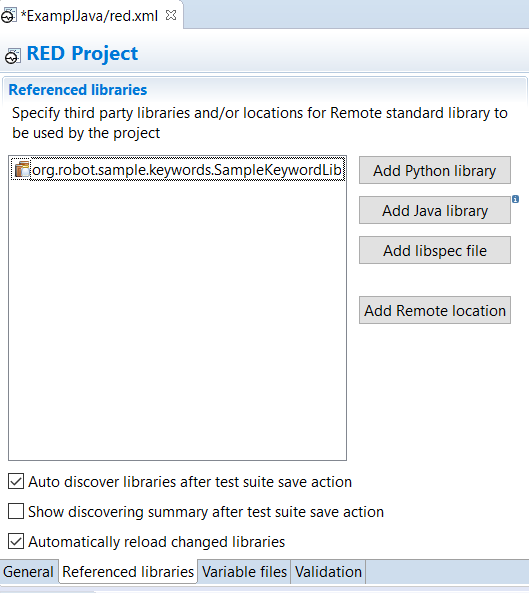
返回到Red. XML,点击引用库然后继续点击添加Java库,选择导出的Jar文件,然后按OK。这将继续加载jar并从Jar文件中读取关键字。保存文件(CTRL-S)。这将导致下面的参考。

现在是时候创建一个机器人文件并使用该库了。在引用的博客中,给出了以下使用java函数/关键字的示例脚本。
*** Settings ***
Library    org.robot.sample.keywords.SampleKeywordLibrary

*** Test Cases ***
ExampleJava
    Create An Empty Stack
    Add An Element    Java
    Add An Element    C++
    Remove Last Element
    The Last Element Should Be    Java
对于已经加载的库,不应出现红线,但右键单击库并单击fast-fix并自动发现库。
然后使用常规Eclipse/RED Run菜单运行脚本。然后这将成功运行脚本并输出以下内容:
Command: C:\jython2.7.0\bin\jython.exe -J-Dpython.path=C:\jython2.7.0\Lib\site-packages -J-cp .;C:\Eclipse\Workspace\ExamplJava\ExampleLibrary.jar -m robot.run --listener C:\Users\User\AppData\Local\Temp\RobotTempDir8926065561484828569\TestRunnerAgent.py:57292:False -s ExamplJava.ExampleJava C:\Eclipse\Workspace\ExamplJava
Suite Executor: Robot Framework 3.0.2 (Jython 2.7.0 on java1.8.0_60)
==============================================================================
ExamplJava
==============================================================================
ExamplJava.ExampleJava
==============================================================================
ExampleJava                                                           | PASS |
------------------------------------------------------------------------------
ExamplJava.ExampleJava                                                | PASS |
1 critical test, 1 passed, 0 failed
1 test total, 1 passed, 0 failed
==============================================================================
ExamplJava                                                            | PASS |
1 critical test, 1 passed, 0 failed
1 test total, 1 passed, 0 failed
==============================================================================
Output:  C:\Eclipse\Workspace\ExamplJava\output.xml
Log:     C:\Eclipse\Workspace\ExamplJava\log.html
Report:  C:\Eclipse\Workspace\ExamplJava\report.html
我终于跟随下面的机器人框架进行了一次伟大的旅程。
1   Installed Java, Eclipse, RED Eclipse plugin.
   a) Java(JDK 1.8.0/JRE 1.8.0)
   b) Eclipse Neon (v 4.6)
   c) RED - Robot Eclipse Editor v0.7.5.2(Eclipse Plugin)
2   Downloaded and Installed Python 2.7.12 using windows. A folder created automatically after installation in C:\python27
3   "Installed Robot Framework using pip command in Command Prompt.
     Command:     C:\python27\scripts>pip install robotframework"
4   Downloaded and installed Jython 2.7.0 using windows. A folder created automatically after installation in C:\jython2.7.0
5   "Installed Robot Framework using pip command in Command Prompt.
     Command:     C:\jython2.7.0\bin>pip install robotframework"
6   "Installed Selenium2Library using pip command in Command Prompt.
     Command:     C:\jython2.7.0\bin>pip install robotframework-selenium2library"
7   "Set the below,
    a) Goto Window-Preferences-Robot Framework-Installed Framework
    b) Map Robot framework with Jython Interpreter
    I used c:\jython2.7.0\bin"
8   Created JavaProject and export it into a jar file. Right click on the class name, click on export-Java-Jarfile. Select the path name where the new jar file to be put including the new file name.jar. Click Ok.
9   Open RED.xml Click Add Java Library and select the newly created jar file.
10  "Set up this before proceeding with robot framework
    goto Windows - Perspective - Open Perspective-Other-Robot"
11  Create a robot suite, import library selenium2library & user defined library, Write Test cases.