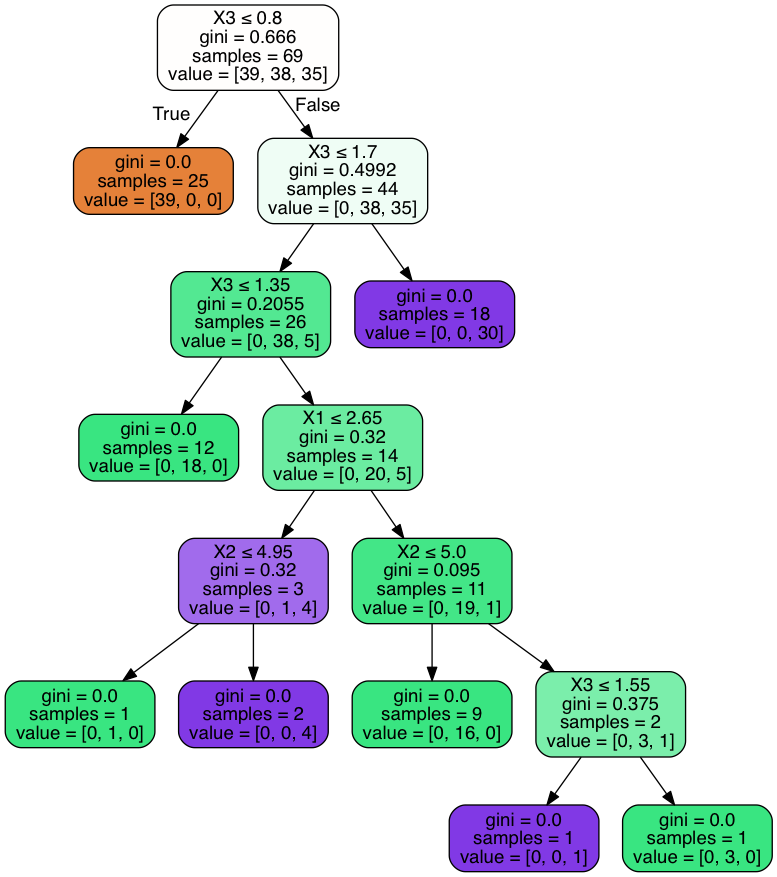

下面是一个简单的随机森林分类器的示例代码,它只使用2棵决策树。此代码最好在jupyter笔记本中运行。
# Setup
%matplotlib inline
import matplotlib.pyplot as plt
from sklearn.datasets import load_iris
from sklearn.cross_validation import train_test_split
from sklearn.ensemble import RandomForestClassifier
from sklearn.metrics import confusion_matrix
import numpy as np
# Set seed for reproducibility
np.random.seed(1015)

# Load the iris data
iris = load_iris()

# Create the train-test datasets
X_train, X_test, y_train, y_test = train_test_split(iris.data, iris.target)

np.random.seed(1039)

# Just fit a simple random forest classifier with 2 decision trees
rf = RandomForestClassifier(n_estimators = 2)
rf.fit(X = X_train, y = y_train)

# Define a function to draw the decision trees in IPython
# Adapted from: http://scikit-learn.org/stable/modules/tree.html
from IPython.display import display, Image
import pydotplus

# Now plot the trees individually
for dtree in rf.estimators_:
    dot_data = tree.export_graphviz(dtree
                                    , out_file = None
                                    , filled   = True
                                    , rounded  = True
                                    , special_characters = True)
    graph = pydotplus.graph_from_dot_data(dot_data)
    img = Image(graph.create_png())
    display(img)
    draw_tree(inp_tree = dtree)
    #print(dtree.tree_.feature)
第一个树的输出是:

可以观察到,第一个决策有8个叶节点,第二个决策树(未显示)有6个叶节点
如何提取包含每个决策树和树中每个叶节点信息的简单numpy数组:
在上面的例子中,我们会有:
{0,1}{0}我们有8个叶节点索引{0,1,…,7}{1}我们有6个叶节点索引{0,1,…,5}{0,1,2} True,否则False,如果它从未在叶节点的决策路径中使用如能帮助将此numpy数组调整为上述代码(循环),我们将不胜感激。
谢谢
类似于这里的问题:如何在python中提取随机林的决策规则
您可以使用@jonnor提供的代码段(我也使用了修改过的代码段):
import numpy
from sklearn.model_selection import train_test_split
from sklearn import metrics, datasets, ensemble

def print_decision_rules(rf):

    for tree_idx, est in enumerate(rf.estimators_):
        tree = est.tree_
        assert tree.value.shape[1] == 1 # no support for multi-output

        print('TREE: {}'.format(tree_idx))

        iterator = enumerate(zip(tree.children_left, tree.children_right, tree.feature, tree.threshold, tree.value))
        for node_idx, data in iterator:
            left, right, feature, th, value = data

            # left: index of left child (if any)
            # right: index of right child (if any)
            # feature: index of the feature to check
            # th: the threshold to compare against
            # value: values associated with classes

            # for classifier, value is 0 except the index of the class to return
            class_idx = numpy.argmax(value[0])

            if left == -1 and right == -1:
                print('{} LEAF: return class={}'.format(node_idx, class_idx))
            else:
                print('{} NODE: if feature[{}] < {} then next={} else next={}'.format(node_idx, feature, th, left, right))


digits = datasets.load_digits()
Xtrain, Xtest, ytrain, ytest = train_test_split(digits.data, digits.target)
estimator = ensemble.RandomForestClassifier(n_estimators=3, max_depth=2)
estimator.fit(Xtrain, ytrain)
另一种方法和可视化:
为了可视化决策路径,可以从中使用库dtreevizhttps://explained.ai/decision-tree-viz/index.html

来源https://explained.ai/decision-tree-viz/images/samples/sweets-TD-3-X.svg
查看他们的影子决策树实现,以获得关于决策路径的更多信息。https://explained.ai/decision-tree-viz/index.html他们还提供了一个例子
shadow_tree = ShadowDecTree(tree_model, X_train, y_train, feature_names, class_names)
然后您可以使用类似于get\u leaf\u sample\u counts的方法。