Spring MVC RESTful风格开发
1 什么是RESTful风格?
RESTful,也叫REST(英文: Representational State Transfer, 简称 REST) 描述了一个架构样式的网络系统,比如 web 应用程序。它首次出现在 2000 年 Roy Fielding 的博士论文中,他是 HTTP 规范的主要编写者之一。在目前主流的三种 Web 服务交互方案中,REST 相比于SOAP(Simple Object Access protocol, 简单对象访问协议) 以及 XML-RPC 更加简单明了, 无论是对 URL 的处理还是对 Payload 的编码, REST 都倾向于用更加简单轻量的方法设计和实现。 值得注意的是 REST 并没有一个明确的标准, 而更像是一种设计的风格。REST 其核心价值在于如何设计出符合 REST 风格的网络接口。 基于这个风格设计的软件可以更简洁, 更有层次, 更易于实现缓存等机制。
简单地说:使用RESTful风格可以让我们客户端与服务端访问的URL更加简洁方便!
以下给出两个例子,前者没有采用RESTful风格,后者采用RESTful风格。
没有采用RESTful风格的URL:
- 增加: http://localhost:8080/user?method=add
- 修改: http://localhost:8080/user?method=update
- 删除: http://localhost:8080/user?method=delete
- 查询: http://localhost:8080/user?method=find
采用RESTful风格的URL:
- 增加: http://localhost:8080/user (使用POST请求)
- 修改: http://localhost:8080/user/1 (使用PUT请求)
- 删除: http://localhost:8080/user/1 (使用DELETE请求)
- 查询: http://localhost:8080/user (使用GET请求)
对比发现,RESTful风格更加简洁,RESTful主要依靠不同的请求方法来区分不同操作类型,这个与传统URL最大的区别。
2 Spring MVC开发RESTful应用
2.1 配置请求方式转换过滤器
为了在前端模拟出不同的请求方式,需要引入SpringMVC提供的HiddenHttpMethodFilter。
<!-- 转换请求方式的过滤器 -->
<filter>
	<filter-name>hiddenHttpMethodFilter</filter-name>
	<filter-class>org.springframework.web.filter.HiddenHttpMethodFilter</filter-class>
</filter>
<filter-mapping>
	<filter-name>hiddenHttpMethodFilter</filter-name>
	<url-pattern>/*</url-pattern>
</filter-mapping>
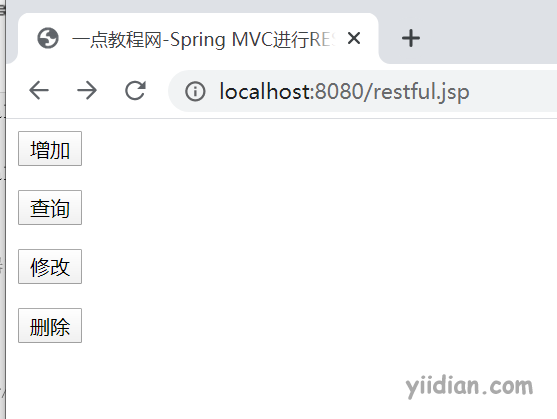
2.2 设计页面
<%@ page contentType="text/html;charset=UTF-8" language="java" %>
<html>
<head>
    <title>一点教程网-Spring MVC进行RESTful风格开发</title>
    <script src="/js/jquery-3.3.1.min.js"></script>
</head>
<body>

<!--增加 -->
<form action="/rest" method="post">
    <input type="submit" value="增加">
</form>

<!--查询 -->
<form action="/rest" method="get">
    <input type="submit" value="查询">
</form>

<!--修改 -->
<form action="/rest/1" method="post">
    <input type="hidden" name="_method" value="put">
    <input type="submit" value="修改">
</form>

<!--删除 -->
<form action="/rest/1" method="post">
    <input type="hidden" name="_method" value="delete">
    <input type="submit" value="删除">
</form>
</body>
</html>
2.3 控制器接收RESTful请求
package com.yiidian.controller;
import com.yiidian.domain.User;
import org.springframework.stereotype.Controller;
import org.springframework.ui.Model;
import org.springframework.ui.ModelMap;
import org.springframework.web.bind.annotation.*;

/**
 *  演示RESTful风格的开发
 * 一点教程网 - www.yiidian.com
 */
@Controller
@RequestMapping("/rest")
public class RestfulController {

    /**
     * 增加
     */
    @RequestMapping(method= RequestMethod.POST)
    @ResponseBody
    public String save(){
        System.out.println("增加...");
        return "success";
    }

    /**
     * 查询
     */
    @RequestMapping(method= RequestMethod.GET)
    @ResponseBody
    public String find(){
        System.out.println("查询...");
        return "success";
    }


    /**
     * 修改
     */
    @RequestMapping(value = "/{id}",method= RequestMethod.PUT)
    @ResponseBody
    public String update(@PathVariable("id") Integer id){
        System.out.println("修改...id="+id);
        return "success";
    }


    /**
     * 删除
     */
    @RequestMapping(value="/{id}",method= RequestMethod.DELETE)
    @ResponseBody
    public String delete(@PathVariable("id") Integer id){
        System.out.println("删除...id="+id);
        return "success";
    }
}
这里有几个注意点:
- 为了接收RESTful请求,使用method属性指定对应的请求方式
- 使用
@PathVariable注解接收RESTful请求的参数 - RESTful风格的请求处理完毕后,通常@ResponseBody注解把数据转换为Json返回,尽量不要转发或重定向页面,因为页面不支持PUT和DELETE请求。
2.4 springmvc.xml配置
<?xml version="1.0" encoding="UTF-8"?>
<beans xmlns="http://www.springframework.org/schema/beans"
       xmlns:xsi="http://www.w3.org/2001/XMLSchema-instance" xmlns:mvc="http://www.springframework.org/schema/mvc"
       xmlns:context="http://www.springframework.org/schema/context"
       xsi:schemaLocation="http://www.springframework.org/schema/beans http://www.springframework.org/schema/beans/spring-beans.xsd http://www.springframework.org/schema/mvc http://www.springframework.org/schema/mvc/spring-mvc.xsd http://www.springframework.org/schema/context http://www.springframework.org/schema/context/spring-context.xsd">

    <!-- 1.扫描Controller的包-->
    <context:component-scan base-package="com.yiidian.controller"/>

    <!-- 2.配置视图解析器 -->
    <bean class="org.springframework.web.servlet.view.InternalResourceViewResolver">
        <!-- 2.1 页面前缀 -->
        <property name="prefix" value="/pages/"/>
        <!-- 2.2 页面后缀 -->
        <property name="suffix" value=".jsp"/>
    </bean>

    <!-- 3.创建处理器适配器和处理器映射器-->
    <mvc:annotation-driven/>

    <!--静态资源处理-->
    <mvc:default-servlet-handler/>
</beans>
2.5 运行测试

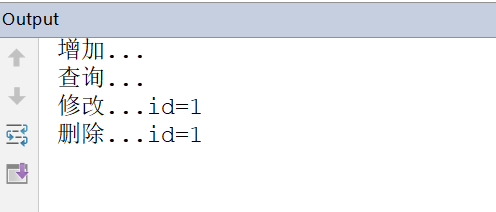
分别点击每个按钮,控制台输出效果如下:

热门文章
优秀文章


