Maven多模块SSM整合
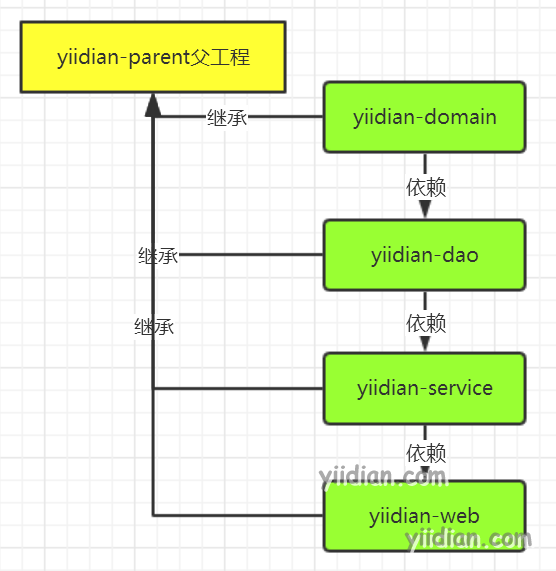
在上文中,我们演示了Spring MVC Maven单模块SSM整合,一些中大型项目,我希望采用Maven多模块构建方式来搭建SSM整合项目。下面在IDEA中演示如何使用Maven的多模块方式构建SSM项目。
Maven多模块构建SSH项目架构图:
1 建立parent工程
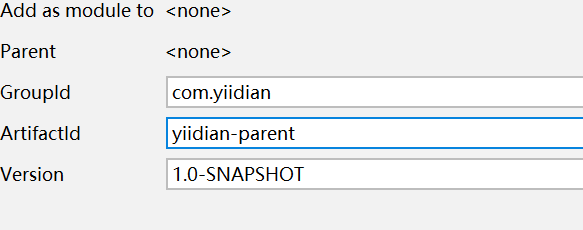
1.1 建立父工程模块
1.2 配置父工程的pom.xml
<?xml version="1.0" encoding="UTF-8"?>
<project xmlns="http://maven.apache.org/POM/4.0.0"
         xmlns:xsi="http://www.w3.org/2001/XMLSchema-instance"
         xsi:schemaLocation="http://maven.apache.org/POM/4.0.0 http://maven.apache.org/xsd/maven-4.0.0.xsd">
    <modelVersion>4.0.0</modelVersion>

    <groupId>com.yiidian</groupId>
    <artifactId>yiidian-parent</artifactId>
    <version>1.0-SNAPSHOT</version>

    <!--
     SSM整合的基础依赖
   -->
    <!-- 1.spring相关的依赖 -->
    <dependencies>
        <!-- 1.1 ioc -->
        <dependency>
            <groupId>org.springframework</groupId>
            <artifactId>spring-context</artifactId>
            <version>5.0.2.RELEASE</version>
        </dependency>
        <!--1.2 aop -->
        <dependency>
            <groupId>org.aspectj</groupId>
            <artifactId>aspectjweaver</artifactId>
            <version>1.8.7</version>
        </dependency>
        <!-- 1.3 声明式事务-->
        <dependency>
            <groupId>org.springframework</groupId>
            <artifactId>spring-tx</artifactId>
            <version>5.0.2.RELEASE</version>
        </dependency>
        <dependency>
            <groupId>org.springframework</groupId>
            <artifactId>spring-jdbc</artifactId>
            <version>5.0.2.RELEASE</version>
        </dependency>
        <!-- 1.4 test -->
        <dependency>
            <groupId>org.springframework</groupId>
            <artifactId>spring-test</artifactId>
            <version>5.0.2.RELEASE</version>
        </dependency>
        <dependency>
            <groupId>junit</groupId>
            <artifactId>junit</artifactId>
            <version>4.12</version>
        </dependency>


        <!-- 2. mybatis相关依赖 -->
        <!-- 2.1 mysql驱动-->
        <dependency>
            <groupId>mysql</groupId>
            <artifactId>mysql-connector-java</artifactId>
            <version>5.1.46</version>
        </dependency>
        <!-- 2.2 数据源 -->
        <dependency>
            <groupId>com.alibaba</groupId>
            <artifactId>druid</artifactId>
            <version>1.1.6</version>
        </dependency>
        <!-- 2.3 mybatis核心包 -->
        <dependency>
            <groupId>org.mybatis</groupId>
            <artifactId>mybatis</artifactId>
            <version>3.4.5</version>
        </dependency>

        <!-- 3. springmvc相关依赖-->
        <!-- 3.1 springmvc核心包 -->
        <dependency>
            <groupId>org.springframework</groupId>
            <artifactId>spring-webmvc</artifactId>
            <version>5.0.2.RELEASE</version>
        </dependency>
        <!--3.2 servlet依赖 -->
        <dependency>
            <groupId>javax.servlet</groupId>
            <artifactId>servlet-api</artifactId>
            <version>2.5</version>
        </dependency>
        <!--3.3 jstl标签库-->
        <dependency>
            <groupId>jstl</groupId>
            <artifactId>jstl</artifactId>
            <version>1.2</version>
        </dependency>

        <!-- 4. log4j日志 -->
        <dependency>
            <groupId>log4j</groupId>
            <artifactId>log4j</artifactId>
            <version>1.2.17</version>
        </dependency>

        <!-- 5. spring与mybatis整合包 *** -->
        <dependency>
            <groupId>org.mybatis</groupId>
            <artifactId>mybatis-spring</artifactId>
            <version>1.3.1</version>
        </dependency>
    </dependencies>
</project>
2 建立Domain工程
2.1 建立子模块
点击父工程右键->Module

2.2 编写Pojo类
package com.yiidian.domain;

import java.util.Date;

/**
 * 实体类
 * 一点教程网 - www.yiidian.com
 */
public class User {
    private Integer id;
    private String username;
    private Date birthday;
    private String sex;
    private String address;

    public Integer getId() {
        return id;
    }

    public void setId(Integer id) {
        this.id = id;
    }

    public String getUsername() {
        return username;
    }

    public void setUsername(String username) {
        this.username = username;
    }

    public Date getBirthday() {
        return birthday;
    }

    public void setBirthday(Date birthday) {
        this.birthday = birthday;
    }

    public String getSex() {
        return sex;
    }

    public void setSex(String sex) {
        this.sex = sex;
    }

    public String getAddress() {
        return address;
    }

    public void setAddress(String address) {
        this.address = address;
    }

    @Override
    public String toString() {
        return "User{" +
                "id=" + id +
                ", username='" + username + '\'' +
                ", birthday=" + birthday +
                ", sex='" + sex + '\'' +
                ", address='" + address + '\'' +
                '}';
    }
}
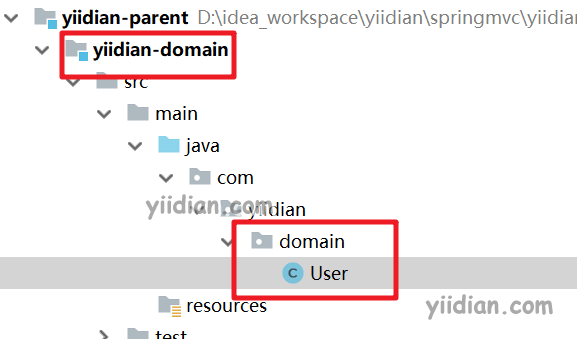
2.3 项目结构
3 建立Dao工程
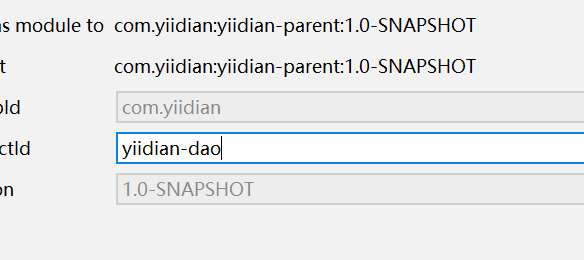
3.1 建立子模块
3.2 依赖domain工程
<dependencies>
    <dependency>
         <groupId>com.yiidian</groupId>
         <artifactId>yiidian-domain</artifactId>
         <version>1.0-SNAPSHOT</version>
    </dependency>
</dependencies>
3.3 编写Dao接口
package com.yiidian.dao;
import com.yiidian.domain.User;
import org.apache.ibatis.annotations.Select;

import java.util.List;

/**
 * Dao接口
 */
public interface UserDao {
    /**
     * 查询所有账户
     */
    @Select("select * from user")
    public List<User> findAll();
}
3.4 编写Spring的Dao配置
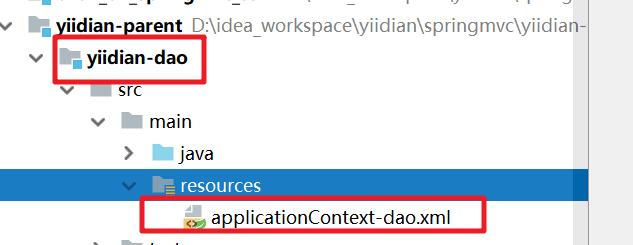
内容如下:
<?xml version="1.0" encoding="UTF-8"?>
<beans xmlns="http://www.springframework.org/schema/beans"
       xmlns:xsi="http://www.w3.org/2001/XMLSchema-instance"
       xmlns:context="http://www.springframework.org/schema/context"
       xsi:schemaLocation="http://www.springframework.org/schema/beans http://www.springframework.org/schema/beans/spring-beans.xsd http://www.springframework.org/schema/context http://www.springframework.org/schema/context/spring-context.xsd">

    <!-- 1. 创建数据源 -->
    <context:property-placeholder location="classpath:jdbc.properties"/>

    <bean id="dataSource" class="com.alibaba.druid.pool.DruidDataSource">
        <property name="url" value="${jdbc.url}"/>
        <property name="driverClassName" value="${jdbc.driver}"/>
        <property name="username" value="${jdbc.username}"/>
        <property name="password" value="${jdbc.password}"/>
    </bean>

    <!-- 2. 为了创建Dao代理对象,先创建SqlSessionFactory对象 -->
    <!--  SqlSessionFactoryBean: 创建SqlSessionFactory对象的工具 -->
    <bean id="sqlSessionFactory" class="org.mybatis.spring.SqlSessionFactoryBean">
        <!-- 注入数据源 -->
        <property name="dataSource" ref="dataSource"/>
    </bean>

    <!-- 3. 扫描Dao接口所在包,扫描后用于创建Dao代理对象,把代理对象放入IOC容器 -->
    <bean class="org.mybatis.spring.mapper.MapperScannerConfigurer">
        <!-- Dao扫描目录 -->
        <property name="basePackage" value="com.yiidian.dao"/>
    </bean>
</beans>
applicationContext-dao.xml文件只存放与Dao有关的配置
3.5 准备jdbc.properties文件
jdbc.driver=com.mysql.jdbc.Driver
jdbc.url=jdbc:mysql://localhost:3306/ssm?characterEncoding=utf8
jdbc.username=root
jdbc.password=root
jdbc.initialSize=3
jdbc.maxActive=10
4 建立Service工程
4.1 建立子模块

4.2 依赖Dao工程
<dependencies>
     <dependency>
         <groupId>com.yiidian</groupId>
         <artifactId>yiidian-dao</artifactId>
         <version>1.0-SNAPSHOT</version>
     </dependency>
</dependencies>
4.3 编写Service接口和实现
Service接口
package com.yiidian.service;

import com.yiidian.domain.User;

import java.util.List;

/**
 * 业务层接口
 * 一点教程网 - www.yiidian.com
 */
public interface UserService {
    /**
     * 查询所有用户
     */
    public List<User> findAll();
}
Service实现类
package com.yiidian.service.impl;

import com.yiidian.dao.UserDao;
import com.yiidian.domain.User;
import com.yiidian.service.UserService;
import org.springframework.beans.factory.annotation.Autowired;
import org.springframework.stereotype.Service;

import java.util.List;

/**
 *业务层实现类
 * 一点教程网 - www.yiidian.com
 */
@Service
public class UserServiceImpl implements UserService{
    //注入Dao对象
    @Autowired
    private UserDao userDao;
    @Override
    public List<User> findAll() {
        return userDao.findAll();
    }
}
4.4 编写Spring的Service配置
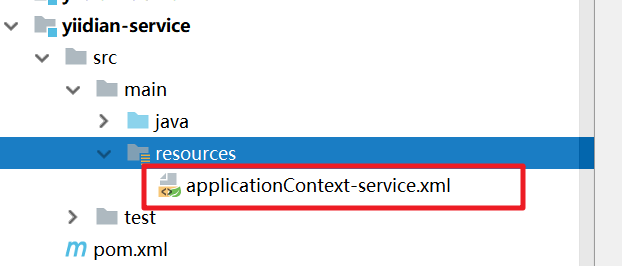
内容如下:
<?xml version="1.0" encoding="UTF-8"?>
<beans xmlns="http://www.springframework.org/schema/beans"
       xmlns:xsi="http://www.w3.org/2001/XMLSchema-instance"
       xmlns:context="http://www.springframework.org/schema/context" xmlns:tx="http://www.springframework.org/schema/tx"
       xmlns:aop="http://www.springframework.org/schema/aop"
       xsi:schemaLocation="http://www.springframework.org/schema/beans http://www.springframework.org/schema/beans/spring-beans.xsd http://www.springframework.org/schema/context http://www.springframework.org/schema/context/spring-context.xsd http://www.springframework.org/schema/tx http://www.springframework.org/schema/tx/spring-tx.xsd http://www.springframework.org/schema/aop http://www.springframework.org/schema/aop/spring-aop.xsd">

    <!--扫描Service接口-->
    <context:component-scan base-package="com.yiidian.service"/>

    <!--Spring声明式事务-->
    <bean id="transactionManager" class="org.springframework.jdbc.datasource.DataSourceTransactionManager">
        <property name="dataSource" ref="dataSource"/>
    </bean>

    <!--事务通知-->
    <tx:advice id="txAdvice" transaction-manager="transactionManager">
        <tx:attributes>
            <tx:method name="get*" isolation="DEFAULT" propagation="SUPPORTS" read-only="true"/>
            <tx:method name="load*" isolation="DEFAULT" propagation="SUPPORTS" read-only="true"/>
            <tx:method name="select*" isolation="DEFAULT" propagation="SUPPORTS" read-only="true"/>
            <tx:method name="find*" isolation="DEFAULT" propagation="SUPPORTS" read-only="true"/>
            <tx:method name="*" isolation="DEFAULT" propagation="REQUIRED"/>
        </tx:attributes>
    </tx:advice>

    <!--事务切面-->
    <aop:config>
        <!--切入点-->
        <aop:pointcut id="pt" expression="execution(* com.yiidian.service.impl.*ServiceImpl.*(..))"/>
        <!--切面-->
        <aop:advisor advice-ref="txAdvice" pointcut-ref="pt"/>
    </aop:config>
</beans>
该配置主要需要扫描Service实现类和配置Spring声明式事务。
5 建立Web工程
5.1 建立子模块
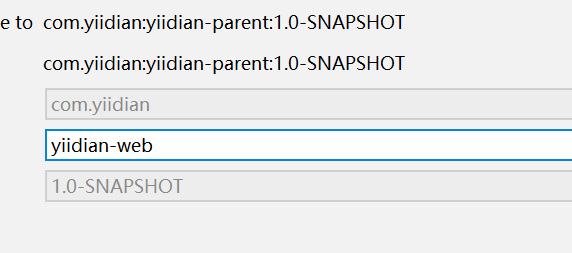
5.2 依赖Service工程
<dependencies>
     <dependency>
        <groupId>com.yiidian</groupId>
        <artifactId>yiidian-service</artifactId>
        <version>1.0-SNAPSHOT</version>
     </dependency>
</dependencies>
该项目为Web项目
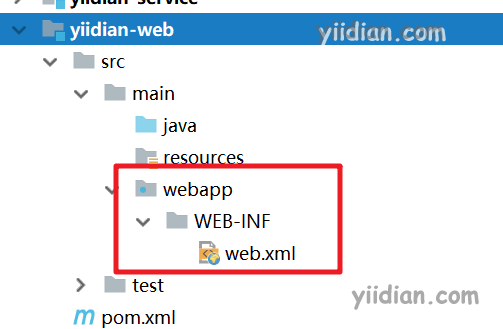
5.3 配置监听器和核心控制器
<?xml version="1.0" encoding="UTF-8"?>
<web-app xmlns:xsi="http://www.w3.org/2001/XMLSchema-instance"
		 xmlns="http://java.sun.com/xml/ns/javaee"
		 xsi:schemaLocation="http://java.sun.com/xml/ns/javaee http://java.sun.com/xml/ns/javaee/web-app_2_5.xsd"
		 version="2.5">

	<context-param>
		<param-name>contextConfigLocation</param-name>
		<param-value>classpath*:applicationContext-*.xml</param-value>
	</context-param>

	<listener>
		<listener-class>org.springframework.web.context.ContextLoaderListener</listener-class>
	</listener>

	<!-- 配置核心控制器 -->
	<servlet>
		<servlet-name>dispatcherServlet</servlet-name>
		<servlet-class>org.springframework.web.servlet.DispatcherServlet</servlet-class>
		<init-param>
			<param-name>contextConfigLocation</param-name>
			<param-value>classpath:springmvc.xml</param-value>
		</init-param>
		<load-on-startup>1</load-on-startup>
	</servlet>
	<servlet-mapping>
		<servlet-name>dispatcherServlet</servlet-name>
		<url-pattern>/</url-pattern>
	</servlet-mapping>
</web-app>
这里注意Spring监听器读取的路径为classpath*:,这个语法指加载当前项目及依赖工程的所有符合条件的文件。因为applicationContext.xml分布在不同的Maven工程,所以必须使用该语法加载!
5.4 springmvc.xml配置
<?xml version="1.0" encoding="UTF-8"?>
<beans xmlns="http://www.springframework.org/schema/beans"
       xmlns:xsi="http://www.w3.org/2001/XMLSchema-instance"
       xmlns:context="http://www.springframework.org/schema/context"
       xmlns:mvc="http://www.springframework.org/schema/mvc"
       xsi:schemaLocation="http://www.springframework.org/schema/beans http://www.springframework.org/schema/beans/spring-beans.xsd http://www.springframework.org/schema/context http://www.springframework.org/schema/context/spring-context.xsd http://www.springframework.org/schema/mvc http://www.springframework.org/schema/mvc/spring-mvc.xsd">

    <!-- 1.扫描控制器 -->
    <context:component-scan base-package="com.yiidian.controller"/>

    <!-- 2.视图解析器 -->
    <bean class="org.springframework.web.servlet.view.InternalResourceViewResolver">
        <property name="prefix" value="/pages/"/>
        <property name="suffix" value=".jsp"/>
    </bean>

    <!-- 3.创建处理器映射器和处理器适配器 -->
    <mvc:annotation-driven/>
</beans>
5.5 编写UserController
package com.yiidian.controller;

import com.yiidian.domain.User;
import com.yiidian.service.UserService;
import org.springframework.beans.factory.annotation.Autowired;
import org.springframework.stereotype.Controller;
import org.springframework.ui.Model;
import org.springframework.web.bind.annotation.RequestMapping;

import java.util.List;

/**
 * 控制器
 * 一点教程网 - www.yiidian.com
 */
@Controller
@RequestMapping("/user")
public class UserController {
    @Autowired
    private UserService userService;

    /**
     * 查询所有用户
     */
    @RequestMapping("/list")
    public String list(Model model){
        //调用业务层方法
        List<User> list = userService.findAll();

        //存入数据到request域
        model.addAttribute("list",list);
        //返回list.jsp页面
        return "list";
    }
}
5.6 编写JSP显示数据
<%@ page contentType="text/html;charset=UTF-8" language="java" %>
<%@ taglib prefix="c" uri="http://java.sun.com/jsp/jstl/core" %>
<html>
<head>
    <title>一点教程网-显示用户数据</title>
</head>
<body>
<h3>用户列表</h3>
<table border="1">
    <tr>
        <td>编号</td>
        <td>用户名</td>
        <td>生日</td>
        <td>性别</td>
        <td>地址</td>
    </tr>
    <!--
    items: 需要需要遍历的集合
    var: 每个对象的变量名称
    -->
    <c:forEach items="${list}" var="user">
        <tr>
            <td>${user.id}</td>
            <td>${user.username}</td>
            <td>${user.birthday}</td>
            <td>${user.sex}</td>
            <td>${user.address}</td>
        </tr>
    </c:forEach>
</table>
</body>
</html>
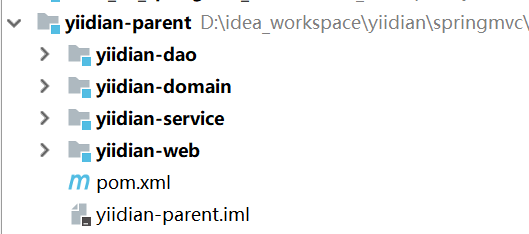
5.7 最终项目结构
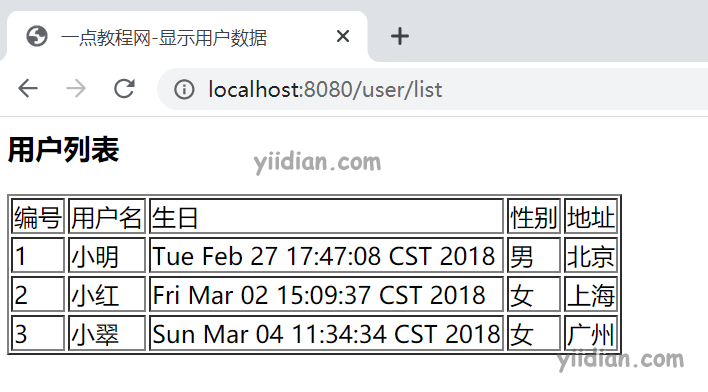
5.8 运行Web项目,访问测试
热门文章
优秀文章


