Spring Boot整合Servlet
在Spring Boot应用如何我们需要编写Servlet相关组件(包括Servlet、Filter、Listener),需要怎么做呢?Spring Boot提供了两种使用Servlet组件的方式:
- 使用@ServletComponentScan注解注册
- 使用@Bean注解注解
1 @ServletComponentScan
1.1 创建项目,导入依赖
<?xml version="1.0" encoding="UTF-8"?>
<project xmlns="http://maven.apache.org/POM/4.0.0"
         xmlns:xsi="http://www.w3.org/2001/XMLSchema-instance"
         xsi:schemaLocation="http://maven.apache.org/POM/4.0.0 http://maven.apache.org/xsd/maven-4.0.0.xsd">
    <modelVersion>4.0.0</modelVersion>

    <groupId>com.yiidian</groupId>
    <artifactId>ch03_01_springboot_servlet1</artifactId>
    <version>1.0-SNAPSHOT</version>

    <!-- 导入springboot父工程. 注意:任何的SpringBoot工程都必须有的!!! -->
    <!-- 父工程的作用:锁定起步的依赖的版本号,并没有真正到依赖 -->
    <parent>
        <groupId>org.springframework.boot</groupId>
        <artifactId>spring-boot-starter-parent</artifactId>
        <version>2.1.11.RELEASE</version>
    </parent>

    <dependencies>
        <!--web起步依赖-->
        <dependency>
            <groupId>org.springframework.boot</groupId>
            <artifactId>spring-boot-starter-web</artifactId>
        </dependency>
    </dependencies>
</project>
1.2 编写Servlet等组件
1)编写Servlet
package com.yiidian.controller;

import java.io.IOException;

import javax.servlet.ServletException;
import javax.servlet.annotation.WebServlet;
import javax.servlet.http.HttpServlet;
import javax.servlet.http.HttpServletRequest;
import javax.servlet.http.HttpServletResponse;
/**
 * 定义Servlet
 * 一点教程网 - www.yiidian.com
 */
@WebServlet(name="helloServlet",urlPatterns="/helloServlet")  // @WebServlet:声明该类为Servlet程序
/**
 * 等同于web.xml配置
 *     <servlet>
 *         <servlet-name>helloServlet</servlet-name>
 *         <servlet-class>com.yiidian.controller.HelloServlet</servlet-class>
 *     </servlet>
 *     <servlet-mapping>
 *     	   <servlet-name>helloServlet</servlet-name>
 *         <url-pattern>/helloServlet</url-pattern>
 *     </servlet-mapping>
 * @author lenovo
 *
 */
public class HelloServlet extends HttpServlet{

	@Override
	protected void doGet(HttpServletRequest req, HttpServletResponse resp) throws ServletException, IOException {
		System.out.println("执行了HelloServlet的doGet方法....");
	}

}
2)编写Filter
package com.yiidian.controller;

import java.io.IOException;

import javax.servlet.Filter;
import javax.servlet.FilterChain;
import javax.servlet.FilterConfig;
import javax.servlet.ServletException;
import javax.servlet.ServletRequest;
import javax.servlet.ServletResponse;
import javax.servlet.annotation.WebFilter;
/**
 * 定义Filter过滤器
 * 一点教程网 - www.yiidian.com
 */
@WebFilter(filterName="helloFilter",urlPatterns="/helloServlet")
public class HelloFilter implements Filter{

	@Override
	public void destroy() {

	}

	@Override
	public void doFilter(ServletRequest arg0, ServletResponse arg1, FilterChain arg2)
			throws IOException, ServletException {
		System.out.println("执行了前面代码");

		//放行执行目标资源:HelloServlet
		arg2.doFilter(arg0, arg1);

		System.out.println("执行了后面代码");
	}

	@Override
	public void init(FilterConfig arg0) throws ServletException {

	}

}
3)编写Listener
package com.yiidian.controller;

import javax.servlet.ServletContextEvent;
import javax.servlet.ServletContextListener;
import javax.servlet.annotation.WebListener;
/**
 * 定义Listener监听器
 * 一点教程网 - www.yiidian.com
 */
@WebListener
public class HelloListener implements ServletContextListener{

	@Override
	public void contextDestroyed(ServletContextEvent arg0) {
		System.out.println("ServletContext对象消耗了");
	}

	@Override
	public void contextInitialized(ServletContextEvent arg0) {
		System.out.println("ServletContext对象创建了");
	}

}
1.3 编写引导类
package com.yiidian;

import org.springframework.boot.SpringApplication;
import org.springframework.boot.autoconfigure.SpringBootApplication;
import org.springframework.boot.web.servlet.ServletComponentScan;

/**
 * Spring Boot引导类
 * 一点教程网 - www.yiidian.com
 */
@SpringBootApplication
@ServletComponentScan  //注册Servlet组件
public class MyBootApplication {

    public static void main(String[] args) {
        SpringApplication.run(MyBootApplication.class,args);
    }

}
注意:在引导类类必须添加@ServletComponentScan注解,该注解用于扫描应用中Servlet相关组件。
1.4 运行测试
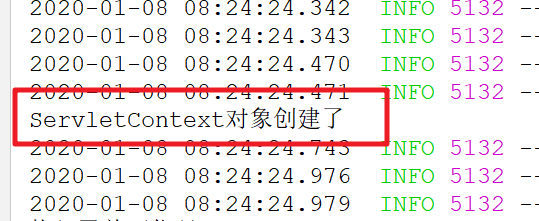
1)项目启动,查看日志

说明监听器已经生效!
2)访问Servlet,查看日志
http://localhost:8080/helloServlet

说明Servlet和Filter生效了!
源码下载:https://pan.baidu.com/s/1iZrl3HKJWUq5ZESbW1Jq3A
2 @Bean
第二种方式的代码和第一种几乎一样,就是引导类的差别,引导类改为使用@Bean注解来注解Servlet、Filter和Listener。
代码如下:
package com.yiidian;

import com.yiidian.controller.HelloFilter;
import com.yiidian.controller.HelloListener;
import com.yiidian.controller.HelloServlet;
import org.springframework.boot.SpringApplication;
import org.springframework.boot.autoconfigure.SpringBootApplication;
import org.springframework.boot.web.servlet.FilterRegistrationBean;
import org.springframework.boot.web.servlet.ServletComponentScan;
import org.springframework.boot.web.servlet.ServletListenerRegistrationBean;
import org.springframework.boot.web.servlet.ServletRegistrationBean;
import org.springframework.context.annotation.Bean;

/**
 * Spring Boot引导类
 * 一点教程网 - www.yiidian.com
 */
@SpringBootApplication
public class MyBootApplication {

    public static void main(String[] args) {
        SpringApplication.run(MyBootApplication.class,args);
    }

    //注册Servlet程序
    @Bean
    public ServletRegistrationBean getServletRegistrationBean(){
        ServletRegistrationBean bean = new ServletRegistrationBean(new HelloServlet());
        //设置访问路径
        bean.addUrlMappings("/helloServlet");
        return bean;
    }

    //注册Filter
    @Bean
    public FilterRegistrationBean getFilterRegistrationBean(){
        FilterRegistrationBean bean = new FilterRegistrationBean(new HelloFilter());
        //过滤器拦截路径
        bean.addUrlPatterns("/helloServlet");
        return bean;
    }

    //注册Listener
    @Bean
    public ServletListenerRegistrationBean<HelloListener> getServletListenerRegistrationBean(){
        ServletListenerRegistrationBean<HelloListener> bean = new ServletListenerRegistrationBean<HelloListener>(new HelloListener());
        return bean;
    }
}
执行效果跟之前是一模一样的!
热门文章
优秀文章


