SpringAOP的零配置
本教程,来看看SpringAOP的如何实现零配置(也就是纯注解)?
一、编写业务类(目标类)
CustomerService接口:
package com.yiidian.service;
/**
 * @author http://www.yiidian.com
 *
 */
public interface CustomerService {

	public void save(String name);

	public void update();
}
CustomerServiceImpl实现:
package com.yiidian.service.impl;

import org.springframework.stereotype.Service;

import com.yiidian.service.CustomerService;
/**
 * 这个类在AOP属于目标对象(Target)
 * @author http://www.yiidian.com
 *
 */
@Service
public class CustomerServiceImpl implements CustomerService {

	@Override
	public void save(String name) {
		System.out.println("执行save方法,name为:"+name);
	}

	@Override
	public void update() {
		System.out.println("执行update方法");
	}

}
实现类要记得添加@Service,让该类作为Spring的IOC容器对象。
二、编写纯注解的切面类
package com.yiidian.aspect;

import org.aspectj.lang.ProceedingJoinPoint;
import org.aspectj.lang.annotation.After;
import org.aspectj.lang.annotation.AfterReturning;
import org.aspectj.lang.annotation.AfterThrowing;
import org.aspectj.lang.annotation.Around;
import org.aspectj.lang.annotation.Aspect;
import org.aspectj.lang.annotation.Before;
import org.springframework.stereotype.Component;

/**
 * Spring的AOP的切面类
 *
 * @author http://www.yiidian.com
 *
 */
@Aspect
@Component
public class MyAspect {

	// 前置通知
	@Before(value = "execution(public * com.yiidian.service.impl.CustomerServiceImpl.*(..))")
	public void before() {
		System.out.println("前置通知");
	}

	// 最终通知
	@After(value = "execution(public * com.yiidian.service.impl.CustomerServiceImpl.*(..))")
	public void after() {
		System.out.println("最终通知");
	}

	// 后置通知
	@AfterReturning(value = "execution(public * com.yiidian.service.impl.CustomerServiceImpl.*(..))")
	public void afterReturning() {
		System.out.println("后置通知");
	}

	// 异常通知
	@AfterThrowing(value = "execution(public * com.yiidian.service.impl.CustomerServiceImpl.*(..))")
	public void afterThrowing() {
		System.out.println("异常通知");
	}

	// 环绕通知
	@Around(value = "execution(public * com.yiidian.service.impl.CustomerServiceImpl.*(..))")
	public void around(ProceedingJoinPoint pjp) {
		System.out.println("前置通知--前面代码");
		//执行目标对象方法
		try {
			pjp.proceed();
		} catch (Throwable e) {
			e.printStackTrace();
		}
		System.out.println("前置通知--后面代码");
	}

}
这里用到了几个相关的注解:
@Aspect: 让该类成为切面类
@Component: 让该类成为Spring的IOC容器类
@Before等注解: 注解方式的通知
三、编写Spring配置类
该类的目标是代替之前的applicationContext.xml
package com.yiidian.test;

import org.springframework.beans.factory.annotation.Configurable;
import org.springframework.context.annotation.ComponentScan;
import org.springframework.context.annotation.EnableAspectJAutoProxy;

/**
 * Spring配置类
 * @author http://www.yiidian.com
 *
 */
@Configurable
@ComponentScan(basePackages="com.yiidian")
@EnableAspectJAutoProxy  // 开启AOP注解功能
public class SpringConfig {

}
四、编写测试类
package com.yiidian.test;

import javax.annotation.Resource;

import org.junit.Test;
import org.junit.runner.RunWith;
import org.springframework.test.context.ContextConfiguration;
import org.springframework.test.context.junit4.SpringJUnit4ClassRunner;

import com.yiidian.service.CustomerService;
/**
 * @author http://www.yiidian.com
 *
 */
@RunWith(SpringJUnit4ClassRunner.class)
@ContextConfiguration(classes=SpringConfig.class)
public class Demo1 {

	@Resource
	private CustomerService customerService;

	@Test
	public void test1(){
		customerService.update();
	}
}
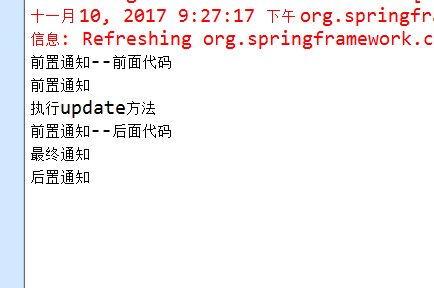
五、运行结果

热门文章
优秀文章


