
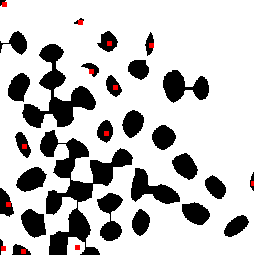
在二值图像上分离(计数)咖啡豆的正确算法是什么?豆子可以触摸和部分重叠。
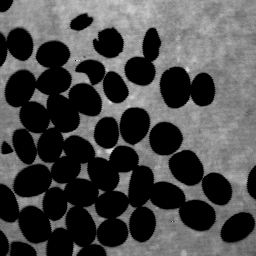
我实际上不是在研究咖啡豆,而是用咖啡豆更容易描述。这是我计算所有在场人员和计算超市监控录像中穿过一些想象线的人的任务中的子问题。我已经将移动的物体提取到二进制掩码中,现在我需要以某种方式将它们分开。
有人在评论中提到的两种有前途的算法:
这种方法是从mmgp详细解释分水岭算法如何工作的答案中派生出来的。因此,如果您需要一些关于代码功能的解释,请查看他的答案。
可以播放代码以提高检测率。这里是:
import sys
import cv2
import numpy
from scipy.ndimage import label

def segment_on_dt(a, img):
    border = cv2.dilate(img, None, iterations=3)
    border = border - cv2.erode(border, None)
    cv2.imwrite("border.png", border)

    dt = cv2.distanceTransform(img, 2, 5)
    dt = ((dt - dt.min()) / (dt.max() - dt.min()) * 255).astype(numpy.uint8)
    _, dt = cv2.threshold(dt, 135, 255, cv2.THRESH_BINARY)
    cv2.imwrite("dt_thres.png", dt)
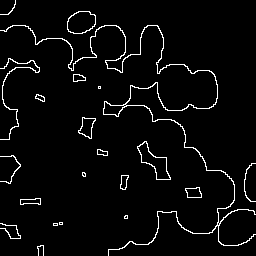
边框(左)、dt(右):
    lbl, ncc = label(dt)
    lbl = lbl * (255/ncc)
    # Completing the markers now.
    lbl[border == 255] = 255

    lbl = lbl.astype(numpy.int32)
    cv2.imwrite("label.png", lbl)
lbl:

    cv2.watershed(a, lbl)

    lbl[lbl == -1] = 0
    lbl = lbl.astype(numpy.uint8)
    return 255 - lbl

# Application entry point
img = cv2.imread("beans.png")
if img == None:
    print("!!! Failed to open input image")
    sys.exit(0)

# Pre-processing.
img_gray = cv2.cvtColor(img, cv2.COLOR_BGR2GRAY)
_, img_bin = cv2.threshold(img_gray, 128, 255, cv2.THRESH_OTSU | cv2.THRESH_BINARY_INV)
cv2.imwrite("img_bin.png", img_bin)

img_bin = cv2.morphologyEx(img_bin, cv2.MORPH_OPEN, numpy.ones((3, 3), dtype=int))
cv2.imwrite("img_bin_morphoEx.png", img_bin)
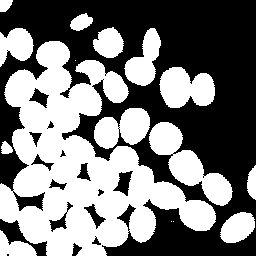
img_bin(左)形态学操作前后(右):
result = segment_on_dt(img, img_bin)
cv2.imwrite("result.png", result)

result[result != 255] = 0
result = cv2.dilate(result, None)
img[result == 255] = (0, 0, 255)
cv2.imwrite("output.png", img)
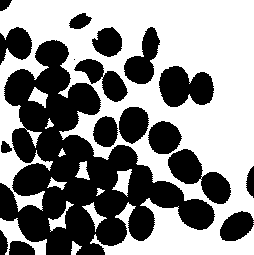
流域分割的结果(左),然后是输出(右):

下面介绍了一种找到每个bean中心的方法。分析帧中分段对象的中心位置,在不同但连续的时间内,可以跟踪它们。保持视觉轮廓或分析其路径可以在对象交叉或有一些重叠的情况下提高跟踪算法的准确性。
我使用马文图像处理框架和Java。
寻找中心方法
我使用了三种基本算法:阈值、形态侵蚀和填充分割。第一步是去除背景的阈值,如下所示。
下一步是应用形态侵蚀来分离豆子。在小内核矩阵的情况下,我可以分离小豆子,但将大豆子保持在一起,如下所示。使用每个独立段的质量(像素数)进行过滤,可以只选择较小的豆子,如下所示。
使用一个大的内核矩阵,我可以将大的内核矩阵分开,小的内核矩阵消失,如下所示。
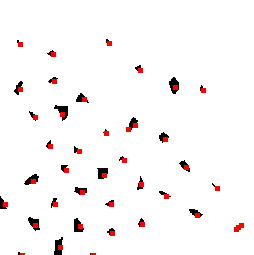
结合两个结果——删除太近的中心点,可能来自同一个bean——我得到了下面的结果。
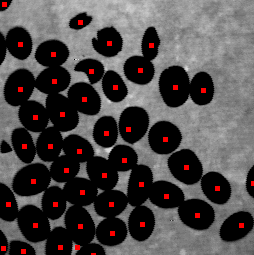
即使没有每个bean的真实片段,使用中心位置也可以计数和跟踪它们。中心也可以用来找出每个bean片段。
源代码
源代码Java,但解决方案中使用的图像处理算法由大多数框架提供。
import static marvin.MarvinPluginCollection.floodfillSegmentation;
import static marvin.MarvinPluginCollection.thresholding;
import marvin.image.MarvinColorModelConverter;
import marvin.image.MarvinImage;
import marvin.image.MarvinSegment;
import marvin.io.MarvinImageIO;
import marvin.math.MarvinMath;
import marvin.plugin.MarvinImagePlugin;
import marvin.util.MarvinPluginLoader;

public class CoffeeBeansSeparation {

    private MarvinImagePlugin erosion = MarvinPluginLoader.loadImagePlugin("org.marvinproject.image.morphological.erosion.jar");

    public CoffeeBeansSeparation(){

        // 1. Load Image
        MarvinImage image = MarvinImageIO.loadImage("./res/coffee.png");
        MarvinImage result = image.clone();

        // 2. Threshold
        thresholding(image, 30);

        MarvinImageIO.saveImage(image, "./res/coffee_threshold.png");

        // 3. Segment using erosion and floodfill (kernel size == 8)
        List<MarvinSegment> listSegments = new ArrayList<MarvinSegment>();
        List<MarvinSegment> listSegmentsTmp = new ArrayList<MarvinSegment>();
        MarvinImage binImage = MarvinColorModelConverter.rgbToBinary(image, 127);

        erosion.setAttribute("matrix", MarvinMath.getTrueMatrix(8, 8));
        erosion.process(binImage.clone(), binImage);

        MarvinImageIO.saveImage(binImage, "./res/coffee_bin_8.png");
        MarvinImage binImageRGB = MarvinColorModelConverter.binaryToRgb(binImage);
        MarvinSegment[] segments =  floodfillSegmentation(binImageRGB);

        // 4. Just consider the smaller segments
        for(MarvinSegment s:segments){
            if(s.mass < 300){
                listSegments.add(s);
            }
        }

        showSegments(listSegments, binImageRGB);
        MarvinImageIO.saveImage(binImageRGB, "./res/coffee_center_8.png");

        // 5. Segment using erosion and floodfill (kernel size == 18)
        listSegments = new ArrayList<MarvinSegment>();
        binImage = MarvinColorModelConverter.rgbToBinary(image, 127);

        erosion.setAttribute("matrix", MarvinMath.getTrueMatrix(18, 18));
        erosion.process(binImage.clone(), binImage);

        MarvinImageIO.saveImage(binImage, "./res/coffee_bin_8.png");
        binImageRGB = MarvinColorModelConverter.binaryToRgb(binImage);
        segments =  floodfillSegmentation(binImageRGB);

        for(MarvinSegment s:segments){
            listSegments.add(s);
            listSegmentsTmp.add(s);
        }

        showSegments(listSegmentsTmp, binImageRGB);
        MarvinImageIO.saveImage(binImageRGB, "./res/coffee_center_18.png");

        // 6. Remove segments that are too near.
        MarvinSegment.segmentMinDistance(listSegments, 10);

        // 7. Show Result
        showSegments(listSegments, result);
        MarvinImageIO.saveImage(result, "./res/coffee_result.png");
    }

    private void showSegments(List<MarvinSegment> segments, MarvinImage image){
        for(MarvinSegment s:segments){
            image.fillRect((s.x1+s.x2)/2, (s.y1+s.y2)/2, 5, 5, Color.red);
        }
    }

    public static void main(String[] args) {
        new CoffeeBeansSeparation();
    }
}
有一些优雅的答案,但我想分享我尝试过的方法,因为它与其他方法有点不同。
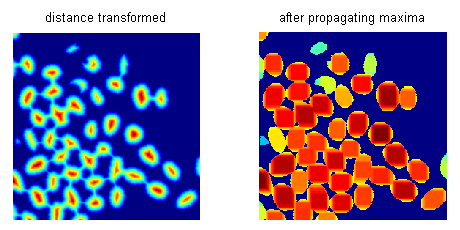
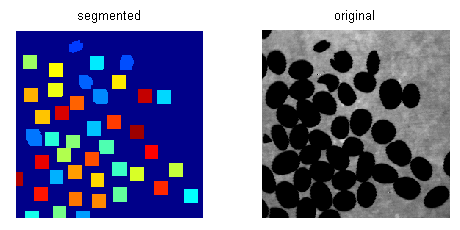
在阈值化和距离变换后,我传播距离变换图像的局部极大值。通过调整极大值传播的程度,我对距离变换图像进行分割,然后按其面积过滤这些片段,拒绝较小的片段。
通过这种方式,我可以实现给定图像的合理良好分割,尽管它没有明确定义边界。对于给定的图像,我使用Matlab代码中使用的参数值来控制最大传播范围和面积阈值,得到42的分段计数。
结果:
这是Matlab代码:
clear all;
close all;

im = imread('ex2a.gif');
% threshold: coffee beans are black
bw = im2bw(im, graythresh(im));
% distance transform
di = bwdist(bw);
% mask for coffee beans
mask = double(1-bw);

% propagate the local maxima. depending on the extent of propagation, this
% will transform finer distance image to coarser segments
se = ones(3);   % 8-neighbors
% this controls the extent of propagation. it's some fraction of the max
% distance of the distance transformed image (50% here)
mx = ceil(max(di(:))*.5);
peaks = di;
for r = 1:mx
    peaks = imdilate(peaks, se);
    peaks = peaks.*mask;
end

% how many different segments/levels we have in the final image
lvls = unique(peaks(:));
lvls(1) = []; % remove first, which is 0 that corresponds to background
% impose a min area constraint for segments. we can adjust this threshold
areaTh = pi*mx*mx*.7;
% number of segments after thresholding by area
nseg = 0;

% construct the final segmented image after thresholding segments by area
z = ones(size(bw));
lblid = 10;  % label id of a segment
for r = 1:length(lvls)
    lvl = peaks == lvls(r); % pixels having a certain value(level)
    props = regionprops(lvl, 'Area', 'PixelIdxList'); % get the area and the pixels
    % threshold area
    area = [props.Area];
    abw = area > areaTh;
    % take the count that passes the imposed area threshold
    nseg = nseg + sum(abw);
    % mark the segments that pass the imposed area threshold with a unique
    % id
    for i = 1:length(abw)
        if (1 == abw(i))
            idx = props(i).PixelIdxList;
            z(idx) = lblid; % assign id to the pixels
            lblid = lblid + 1; % increment id
        end
    end
end

figure,
subplot(1, 2, 1), imshow(di, []), title('distance transformed')
subplot(1, 2, 2), imshow(peaks, []), title('after propagating maxima'), colormap(jet)
figure,
subplot(1, 2, 1), imshow(label2rgb(z)), title('segmented')
subplot(1, 2, 2), imshow(im), title('original')
