vue实现户籍管理系统
本文向大家介绍vue实现户籍管理系统,包括了vue实现户籍管理系统的使用技巧和注意事项,需要的朋友参考一下
本文实例为大家分享了vue实现户籍管理系统的具体代码,供大家参考,具体内容如下
户籍管理系统,v-model,v-for的引用
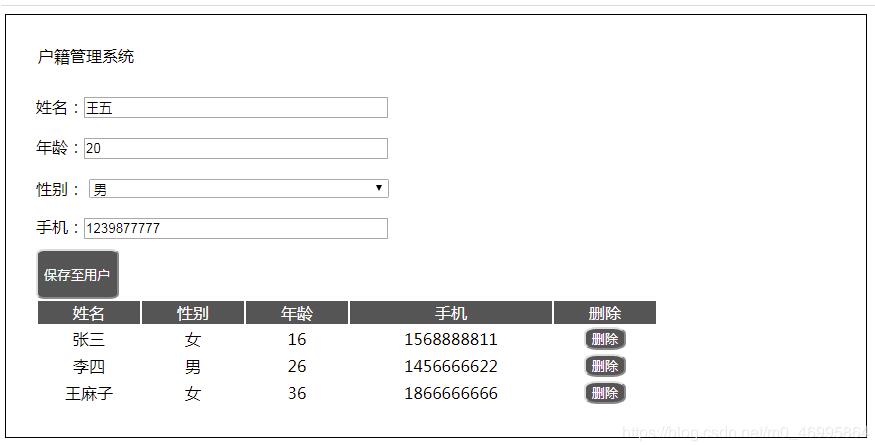
界面预览

步骤思路:
1.html+css创建
2.引入vue,实例
3.准备默认数据message数组
4.渲染默认数据,v-for循环表单
5.创建一条新数据newmessage
6.绑定到输入框v-model
7.创建一个添加函数add(),把新数据添加到默认数据中,newmessage->message
8.添加完后,清空表单,即恢复newmessage
9.点谁删谁del()函数
body部分:
<script src="https://cdn.jsdelivr.net/npm/vue/dist/vue.js"></script>
<div id = 'app' v-cloak>
 <legend>户籍管理系统</legend></br>
 姓名:<input type="text" placeholder="请输入用户名" v-model = 'newmessage.name'></br>
 年龄:<input type="text" placeholder="请输入年龄" v-model = 'newmessage.age'></br>
 性别:
 <select v-model = 'newmessage.sex'>
 <option>男</option>
 <option>女</option>
 </select></br>
 手机:<input type="text" placeholder="请输入手机号" v-model = 'newmessage.phone'></br>
 <button class = 'save' @click = 'add()'>保存至用户</button></br>
 <table>
 <tr class = 'title'>
 <td width = '100px'>姓名</td>
 <td width = '100px'>性别</td>
 <td width = '100px'>年龄</td>
 <td width = '200px'>手机</td>
 <td width = '100px'>删除</td>
 </tr>
 <tr v-for = 'item,index in message'>
 <td>{{item.name}}</td>
 <td>{{item.sex}}</td>
 <td>{{item.age}}</td>
 <td>{{item.phone}}</td>
 <td><button @click = 'del(index)'>删除</button></td>
 </tr>
 </table>
</div>
vue部分:
<script>
 var app = new Vue({
 el:'#app',
 data:{
 message:[
  {
  name:'张三',
  sex:'女',
  age:16,
  phone:'1568888811'
  },
  {
  name:'李四',
  sex:'男',
  age:26,
  phone:'1456666622'
  },
  {
  name:'王麻子',
  sex:'女',
  age:36,
  phone:'1866666666'
  },
 ],
 newmessage:{name:'',age:'',sex:'男',phone:''},

 },
 methods:{
 add(){
  if(!this.newmessage.name == ''){
  this.message.push(this.newmessage);
  this.newmessage = {
  name:'',
  age:'',
  sex:'男',
  phone:''
  };
  }
  else{
  alert('请输入姓名!');
  }
 },
 del(index){
  this.message.splice(index,1);
 }
 }
 })
 </script>
css样式:
<style>
 *{
 margin:0;
 padding:0;
 }
 #app{
 border: 1px solid black;
 width:800px;
 padding:30px 30px;
 }
 #app .save{
 background-color: #555555;
 border-radius: 10%;
 height:50px;
 color:white;
 }
 #app input,select{
 margin:10px 0;
 width:300px;
 }
 #app td{
 text-align: center;
 }
 #app .title td{
 background-color: #555555;
 color:white;
 }
 #app table button{
 background-color: #555555;
 color:white;
 border-radius: 30%;
 }
 </style>
以上就是本文的全部内容,希望对大家的学习有所帮助,也希望大家多多支持呐喊教程。
声明:本文内容来源于网络,版权归原作者所有,内容由互联网用户自发贡献自行上传,本网站不拥有所有权,未作人工编辑处理,也不承担相关法律责任。如果您发现有涉嫌版权的内容,欢迎发送邮件至:notice#yiidian.com(发邮件时,请将#更换为@)进行举报,并提供相关证据,一经查实,本站将立刻删除涉嫌侵权内容。

