基于javascript实现碰撞检测
本文向大家介绍基于javascript实现碰撞检测,包括了基于javascript实现碰撞检测的使用技巧和注意事项,需要的朋友参考一下
本文实例为大家分享了javascript实现碰撞检测的具体代码,供大家参考,具体内容如下
<html>
<head>
<style>
#div1 {width:100px; height:100px; background:red; position:absolute; z-index:2;}
#div2 {width:100px; height:100px; background:yellow; position:absolute; left:230px; top:220px; z-index:1;}
</style>
<meta http-equiv="Content-Type" content="text/html; charset=utf-8" />
<title>无标题文档</title>
<script>
window.οnlοad=function ()
{
 var oDiv=document.getElementById('div1');
 var oDiv2=document.getElementById('div2');

 oDiv.οnmοusedοwn=function (ev)
 {
 var oEvent=ev||event;
 var disX=oEvent.clientX-oDiv.offsetLeft;
 var disY=oEvent.clientY-oDiv.offsetTop;

 document.οnmοusemοve=function (ev)
 {
  var oEvent=ev||event;

  oDiv.style.left=oEvent.clientX-disX+'px';
  oDiv.style.top=oEvent.clientY-disY+'px';

  var l1=oDiv.offsetLeft;//红块左边线
  var r1=oDiv.offsetLeft+oDiv.offsetWidth;//红块右边线
  var t1=oDiv.offsetTop;//红块上边线
  var b1=oDiv.offsetTop+oDiv.offsetHeight;//红块下边线

  var l2=oDiv2.offsetLeft;//黄块左边线
  var r2=oDiv2.offsetLeft+oDiv2.offsetWidth;//黄块右边线
  var t2=oDiv2.offsetTop;//黄块上边线
  var b2=oDiv2.offsetTop+oDiv2.offsetHeight;//黄块下边线

  if(r1<l2 || l1>r2 || b1<t2 || t1>b2)
  {
  oDiv2.style.background='yellow';
  }
  else
  {
  oDiv2.style.background='green';
  }
 };

 document.οnmοuseup=function ()
 {
  document.οnmοusemοve=null;
  document.οnmοuseup=null;
 };
 };
};
</script>
</head>

<body>
<div id="div1"></div>
<div id="div2"></div>
</body>
</html>

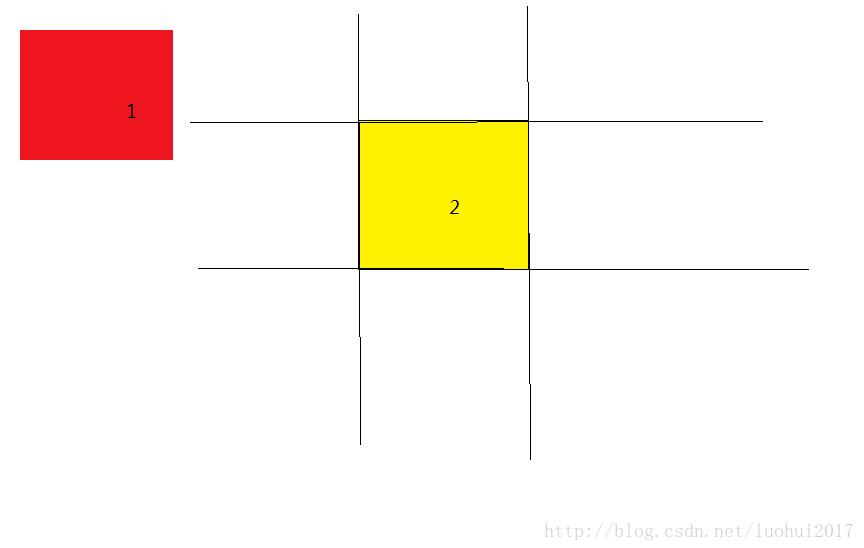
碰撞检测原理图如上:
我们检测碰撞时,发现两个div碰上检测比没碰上的检测要难,所以以没碰上作为检测条件。画上九宫格,当红色div在黄色div左边线或是右边线或是上边线或是下边线外时是永远不可能碰上的,只要这四个条件都不满足,意味着两个div相撞了,将黄块变绿。
以上就是本文的全部内容,希望对大家的学习有所帮助,也希望大家多多支持呐喊教程。
声明:本文内容来源于网络,版权归原作者所有,内容由互联网用户自发贡献自行上传,本网站不拥有所有权,未作人工编辑处理,也不承担相关法律责任。如果您发现有涉嫌版权的内容,欢迎发送邮件至:notice#yiidian.com(发邮件时,请将#更换为@)进行举报,并提供相关证据,一经查实,本站将立刻删除涉嫌侵权内容。

